Wednesday, May 15, 2013

S'mores Cupcakes

Joe and I are going on a camping trip to the Grand Canyon this weekend. We're pretty excited as neither of us has ever been! I have had s'mores on my mind ever since we started making plans for the weekend. I started making a list of things to bring a week in advance.... and things to bake 2 weeks in advance! S'mores have been on my mind ever since we made the official plans. I made a quick check of my Pinterest page for inspiration and realized I have been obsessing over s'mores for far too long. I had... wait for it, waaaait for it..... TEN pins on my dessert page for things to make using s'mores inspiration. 10 and counting, I'm pretty sure I added a few more the other day. I needed a fix. I needed one bad.


Joe took one bite and just shook his head "yes" and widened eyes. That was BEFORE the marshmallow fluff frosting was on top! He likes to give me detail in what's happening in his taste buds "at first I thought it was dry but then I realized my tongue had just touched the graham cracker crust, then when I started chewing the chocolate and graham cracker came together and totally tasted like a s'more. That is probably the best chocolate anything I've ever eaten... and you know how I feel about chocolate (he's not that in to it)." I am telling you, begging you... bake these cupcakes. I promise you will get your s'mores fix and you can take these anywhere with you.

The combination of the chocolate bits in the cake, the slightly crunchy graham cracker crust and the topping that is completely homemade but tastes JUST like marshmallows gave these cupcakes all the components of a true s'more.


This batter was all made using one bowl, gotta love that. People not suffering from altitude can use a mixer for their cake batter. To avoid too much air getting in, I mixed everything by hand. I'd suggest using a mixer if you're not in the mountains. One of the other things I was all too please about after these cupcakes came out of the oven was that they didn't sink in the middle... a result of altitude (among several others).


Ingredients

Chocolate Cake Batter: adapted from Hershey's
1 3/4 cup flour
3/4 cup Hershey's unsweetened cocoa powder
2 cups sugar
1 tsp baking soda
1 tsp salt
1 cup whole milk
1/2 cup canola oil
2 tsp vanilla
2 eggs
1 cup boiling water
1 bag Hershey's milk chocolate chips

Graham Cracker Crust
20 Graham crackers (crush up)
6 Tbsp melted butter
pinch of salt
2 tsp sugar

Marshmallow Frosting
4 egg whites
1 cup sugar
1 tsp vanilla
pinch of salt


Directions

Cake:
Mix all dry ingredients (flour, cocoa, sugar, baking soda and salt) in a large bowl.


Add milk, oil, vanilla and eggs straight into the bowl and thoroughly mix everything together.


Add boiling water and combine.


It will be runny.

Graham Cracker Crust:

Put 20 broken up graham crackers into a food processor and pulse until crushed.

 In bowl mix crushed graham crackers, salt, sugar, and melted butter with a fork.

Marshmallow Frosting:
Add egg whites, sugar and salt to bowl over simmering water (or double broiler). Cook, stirring constantly, until sugar is dissolved and mixture is hot. About 5 minutes. Add hot mixer to a bowl or stand mixer and beat  on high until stiff peaks form.

Assembly

Line cupcake tin with cupcake liners. Scoop 1 Tbsp of graham cracker mixture into each cup and press the crust gently with the back of the spoon to pack it tightly in the bottom of the cup.


Scoop in batter on top til about 2/3 the way full. 


Drop chocolate chips on top of  batter (be generous). Bake at 375 for 15 minutes (high altitude) or 350 for 18-22 min.


Pipe frosting onto completely cooled cupcakes. May use a ziploc bag with the corner snipped off if you don't have a piping bag! After piping my cupcakes I decided to give it a whirl and try to toast the marshmallow fluff topping with a lighter... totally worked! Took a while, but they got that yummy toasted marshmallow taste that is essential to s'mores. I totally had a picture of that, but the boyfriend got confused and took the wrong container of cupcakes to work to share with the guys before I got the pictures taken. (Sorry I didn't get any pictures of the frosting process... I was just too excited!


Tuesday, May 14, 2013

Gluten Free Pumpkin Waffles

Ok.. ok.. OK! So I know I said this blog would contain healthy food too. I figured these gluten free pumpkin waffles would be the best way to start! I eat these waffles at least 3 days out of the week. They are a little labor intensive to make for just myself, but oh, are they worth it! 

On my new health plan, I eat hardly any carbs most days. Breakfast is the best meal of the day to me because I get to change it up with my oatmeal. These waffles can also be made as pancakes, I just prefer sticking the batter in a waffle iron so I don't have to go through the wait before eating them.


 Ingredients

 1/2 cup old fashioned oats
pinch of baking soda
pinch of baking powder
1 packet Stevia in the Raw
2 egg whites
1/4 cup fat free cottage cheese
1/4 cup pumpkin puree
cinnamon to taste


Directions

In a food processor or blender, grind oats until they are very fine.


 Pour into bowl and add baking soda, baking powder, Stevia and cinnamon.

Set aside in a separate bowl. In mixer add egg whites, cottage cheese and pumpkin.

 Blend until smooth and chunks are gone.

Add the wet mixer ingredients to the dry mixer and stir by hand.


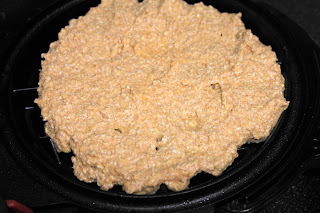
If cooking in waffle iron lightly grease and cook for about 3 minutes (until outside of waffle is golden brown.) The batter is very thick so you will need to spread it out into the waffle iron or skillet with your spatula.


If cooking as pancakes place about 1/2 the batter on a grease pan set on medium heat.


Now pour the good stuff on. Don't worry!!! This won't ruin your healthy breakfast. Use Walden Farms Maple Syrup, 0 calories, 0 carbs, 0 sugar... and for what it is, doesn't taste too shabby! I also sprayed the crap out of my waffle with I Can't Believe It's Not Butter Spray. When I told Joe's brother about this his response was "You go to all that work to make that healthy waffle and then you put THAT plastic all over it?!" My response? "I like it, and I have to give and take a little. It's not the MOST nutritious, but there could be worse!" He nodded his head in approval. Even if he hadn't... I'd still be taking off the sprayer and just drizzling that plastic butter all over my pumpkin waffle. But definitely give the Walden Farms Maple Syrup a try! I've seen it in blueberry flavor but have yet to try it.... get the ranch too.. and the chipotle ranch.... and the honey mustard... oh heck, try them all!


Monday, May 13, 2013

Fruity Pebbles Cupcakes

After Joe brought those scrumptious Chocolate Peanut Butter Surprise cupcakes to work, he got some requests from they guys. I guess that means they loved the cupcakes too! (I'm not kidding, I was opening up the tupperware container of the leftover cupcakes and taking deep breaths trying to remember the taste). There are some particular guys that he works with, one doesn't like peanut butter OR frosting. I don't know how he could possibly enjoy life without liking either of those, but I guess he's making it through.

One request Joe brought home was for red velvet and the other was for fruity pebbles cupcakes. Being a rebel I didn't want to stick with something conventional (at least not today). Plus I'm not huge on fruit flavored desserts so I knew I could resist them. Resistance was feudal... these fruity pebble cupcake concoctions were delicious.

These take on a banana bread texture and are very dense. The Fruity Pebble cake topped with the "milk" frosting reminded me of those cereal bars with the milk between the layers. SO good.. fruity and the frosting really does take on a sweet milk taste! Perfectly acceptable for breakfast.


Once again, I mixed and matched and changed things here and there to my liking... and the high altitude. This recipe yields about 12 cupcakes.

Ingredients

Fruity Pebble Cake: adapted from Key Ingredient
6 oz unsalted butter (softened)
3/4 cup granulated sugar
1 egg + 1 egg yolk (use 3 whole eggs if doubling recipe)
3/4 tsp baking powder (1 if not high altitude)
1/4 tsp baking soda (1/2 if not high altitude)
1 tsp vanilla
1 ripe banana (pureed)
1 1/4 cup flour
6 oz whole milk
1 cup Fruity Pebble Cereal


"Milk" Frosting: from Cupcakes Garden
1 1/2 cups confectioners' sugar
6 oz butter (softened)
1/4 cup + 1 Tbsp sweetened condensed milk

Directions

Preheat oven to 375 (350 no high altitude)

Mix butter and sugar until light and fluffy in mixer. Add egg and egg yolk 1 at a time and continue beating for 30 seconds. Add baking powder, baking soda and vanilla and mix until just incorporated. Puree banana (If you don't mind chunks just mash) and add to mixture, stirring by hand. Continue to mix by hand and take turns adding in flour and milk, beginning and ending with flour. (Optional: Put Fruity Pebbles in food chopper or mixer pulse a few times to get smaller pieces.) Add cereal to batter and stir until just mixed.


Lightly spray cupcake tin with cooking spray or line tin with cupcake liners. Fill cupcake tins about 3/4 full. You can be generous with the filling, these cupcakes take on more of a banana bread  consistency than a light cake batter so they do not raise as high.

Bake for 15 minutes or until toothpick comes clean. (18-22 without high altitude)

To make the frosting, mix butter and sugar until light and fluffy. Add sweetened condensed milk and mix until well incorporated. If the frosting is too runny, add a bit more powdered sugar. You can sprinkle cereal on top like I did for this cupcake, or you can reserve a bowl of cereal on the side and dunk your cupcake in after frosting, totally up to you!  Make sure you wait until the cakes are COMPLETELY cooled before icing. Don't get overzealous like I did, or your icing will run down your cupcake and you'll be forced to wipe it off and probably eat it, then re-do the cupcakes so they are pretty.

Friday, May 10, 2013

Peanut butter Surprise Cupcakes

I wasn't lying when I said this blog would be filled with cupcakes now. To kick off my official food blog I would like to present to you... Dadadadaaaaaaaaaaa.... PEANUT BUTTER SURPRISE CUPCAKES. Now, I'd like to say that I completely developed these recipes on my own. Yeah right. I'm no expert and I don't pretend to be one. I give credit where credit is due. I did, however, make them my own by combining recipes I thought looked good from various sources... so you could kind of say they were "adapted"... yeah... adapted is what I'll go with. Hopefully I'll start creating some on my own (which I will kind of have to do considering the high altitude here in Albuquerque, grrrr).


These cupcakes are the kind that make your eyes roll and your head tip back from pure dessert ecstasy. In Joe's world these are called "mouthgasms". He told me all the guys at his work were having them all over the place when he brought these bad boys in over lunch. Honestly, I don't blame them and I can totally relate. I ate mine over the kitchen sink... didn't even bother to sit down.


These cupcakes are a chocolate cake with a peanut butter ball center, whipped peanut butter butter cream, topped with a peanut butter cookie half. Too much peanut butter you say? There's no such thing... literally... no.such.thing.


I ate them with and without the frosting. The super moist cake was delicious on it's own.. as was the butter cream... but together they created something unimaginable... inconceivable... to die for. I will definitely be making these again as they didn't really puff up at all I'm wondering if it's because of the peanut butter center or perhaps I need to tweak the recipe due to the altitude. Either way they were still delicious and I look forward to being obligated to make them again. I'm sure the boys would have no objections to that!

Chocolate Peanut Butter Surprise Cupcakes

Ingredients

Chocolate Cake: from Annie's Eats
1 2/3 cup all-purpose flour. 
3/4 cup unsweetened cocoa powder
1 tsp baking soda
1/2 tsp salt
1 cup sour cream
2 Tbsp milk
1 tsp vanilla extract
1 stick unsalted butter (at room temp)
1 1/2 cups sugar
2 large eggs

Peanut Butter Filling: from  Pillsbury
1 egg
8 oz cream cheese, softened
3/4 cup creamy peanut butter
1/3 cup granulated sugar
1/3 cup powdered sugar

Whipped Peanut Butter Butter Cream: from  Annie's Eats
8 oz cream cheese (room temp)
1/2 stick unsalted butter, softened
1/2 cup creamy peanut butter
3 1/4 cups confectioners' sugar


Directions

Preheat oven to 350 degrees

To make the chocolate cake:
Combine flour, cocoa powder, salt, and baking soda in a medium bowl; whisk together. In  a small bowl, stir together milk, sour cream and vanilla extract. In a  mixer, combine butter and sugar and beat until light and fluffy. Beat the eggs into the butter/sugar mixture one at a time. With the mixer on slow, incorporate the dry ingredients and the sour cream mixture by alternating with each. Begin and end mixing with the dry ingredients. Mix until just incorporated.

To make the peanut butter filling:
Beat egg, cream cheese, peanut butter, and granulated sugar in the mixer until smooth, medium should do it. Slowly add powdered sugar and beat until creamy. 

Line your cupcake tin with cupcake liners and spoon in the chocolate cake mixture to the bottom of each cup, about 1- 1.5 Tablespoons. Next use a Tablespoon and plop a dollop of peanut butter filling into the center of the cupcake liner. Finally top the peanut butter filling off with more chocolate batter and gently spread it completely over the peanut butter so there's no space between the batter and the side of the liner. Your cupcake liner should be about 2/3 full.

Bake for 18-22 minutes until you can poke a toothpick through and it comes out clean. Let cool completely before frosting.

For the Whipped Peanut Butter Butter Cream:
Beat the cream cheese, butter and peanut butter until thoroughly mixed. Slowly add in confectioners' sugar (unless you like a mess then just dump it all in). Finally fold in your whipped topping by hand.

For the Peanut Butter Cookie:
I had peanut butter mixture left over from my cupcakes so I used the rest and spooned about a Tbsp into empty cupcake liners after my cupcakes were baked. I left the oven at 350 and baked them for about 7 minutes. Once they were cooled I cut them in half and topped off my cupcakes!

Yields 22-24 cupcakes


Thursday, May 9, 2013

New Blog Inspiration

Well.. it's time to announce that my blog will be changing. It's already adapted to my many needs... first it was used to keep in contact with my friends, family, and lovely students. Now I will be slowly transforming it into a "food" blog. You may notice more cupcakes than anything, that's because the Creative Cookie is now adding cupcakes!  (If you'd like the shorted version as to why then you should probably just scroll to the last paragraph... if you'd like to hear my 2 cents worth on working out and dieting then read on!) Here is where everything gets a little complicated, however. I have a constant struggle in my life between two worlds.

 In one world there is the chocolate lover in me that will devour anything and everything sweet that is dripping with chocolate, caramel, or any kind of sugar for that matter. I love nothing more than to sink my teeth into a moist cake, a chocolate chip muffin (even the packaged kind *gasp*), or cookies. I'm not too picky, which is kind of my problem. As long as there is sugar, I'm in.

In the second world I want a 6-pack and I eat 5 meals a day with 3-4 hours in between. Carbs in the morning, meat and veggies all meals following. Work out 5-6 days a week, even with a trainer. I want to wear tight jeans and not worry about a muffin top I'd rather not eat. I try to stick to 1 cheat meal a week, TRY.

If you follow me on Pinterest you will see that I am constantly posting back and forth to one board labeled "Desserts and Decadence" while simultaneously pinning to a board called "Healthy is the New Skinny". It's a battle of food that I am finally coming to balance. There's no such thing as having all or nothing in my book when it comes to food. Too many times I have tried to eat healthy only to feel guilt and shame when in a moment of weakness I shove a cookie down my throat so fast I can barely taste it... so then have to eat one more... or 5 more.

I have come to realize after several failed attempts at trying to look like a fitness model that I can have goals and still achieve them while satisfying my sweet tooth at the same time. It's called MODERATION. You heard of it? Yeah, me too, only I never listened. Sure I wait to eat a full cheat meal until Saturdays, but I also taste my recipes, lick the bowl, and sometimes let myself slide. It's how I keep my sanity. I'm not saying I do it every day. Some weeks I go the whole week without budging once until my cheat meal. Others I simply must have a cookie on Tuesday and a half a cupcake on Thursday. I have my goals and I'm reaching them one day at a time.

It's all in the mind. You have to stop thinking about what you can't have and start finding things you can that you LIKE. The first day I started on my new diet healthy lifestyle plan I forced a bowl of plain oatmeal and eggs down my throat and had to keep myself from gagging. I would have never stuck with my plan if I hadn't adapted and experimented. Now I look forward to almost every meal I eat and they are all part of my healthy and balanced meal plan!

Remember that little word I threw in up there called "moderation"... that's mod-er-a-shun....? It applies to exercise too. In college I went through a period where I ran 5 miles a day and ate 1200 calories. Sound psycho to you? It should. If you're doing this... stop immediately. I learned the hard way that you have to eat to lose weight. Sounds counter intuitive, but it's true. Anyone who knows anything about nutrition will tell you that starving yourself is going to get you nowhere...except unhappy and frustrated. I'm no nutritionist so I won't go into full detail.. but please don't count your calories. It was hard for me to stop but I did, and now I look better and feel better.

I am now at a point where I am finding tasty and satisfying healthy meals AND decadent-soul satisfying desserts. I love being fit and feeling great, but I also love dessert. Always have, always will. No need to fight it. I don't have to choose between the two worlds and neither do you! It's all about balance... so that's what I'm going to be blogging about! The healthy meals and desserts I make. I've learned to balance the two in a way to live a healthy and SATISFYING life. Trust me.... it wasn't easy.


Wednesday, May 1, 2013

Curious George Cookies

Curious George cookies... I have been waiting to make them for well over a month. Yesterday the time finally came. I created these cookies to match a birthday party theme. I was pretty excited to start making them and then as I was studying the pictures of what I wanted them to look like, I got kind of nervous. There were so many fine details and small areas that I needed to fill in order to make George look just right. It was a slow process with a little trial and error, but in the end it all worked out.


Monday, April 29, 2013

Sleeping Beauty

I love getting custom orders, mostly because then I get to build my cookie library and check off another design! After my Brave cookies went up I was asked about Sleeping Beauty. Hopefully Snow White, Belle, Jasmine, Ariel, and all the other lovely princesses will follow! I have recently tried to take on the mindset of "less is more" with decorating. Not meaning less detail... meaning less work for me. I've discovered the art of mostly decorating with 20 second icing and then piping the details on. I used mostly 20 second icing for Aurora in these cookies. The details on her face were so fine, I used edible food markers to create the details in her face, just like I did with Merida. I think they turned out pretty great!